Create and Add Content to Digital Signage
Update: This article has been moved to the Answers @ ACES knowledgebase
Create your content file (PDF, PowerPoint presentation, image) on your local computer. If possible, this should be done by using the templates provided to you in the digital signage drive under ACES\Shared\Templates. If one of these templates won’t work for you please contact Jennifer Shike so a new template can be made for you that fits our current ACES scheme.
When using the templates: Open up the .ppt file and simply add content to the different regions. When you’re finished editing save your file as a .pdf, FWi doesn’t play nicely with power-point files, and make sure not to save over the template file.
When not using the templates: Our main content region is sized at 1920 x 820 pixels; make sure your content is this size. DO NOT take images on a 4:3 scale and stretch them to fit, new images sized at 1920 x 820 will need to be created.
Once the content piece is created, save this file to the Digital Signage shared drive in your departmental folder.
After you’ve saved the file to the drive, you’ll then need to remote connect to CITES’ FWi terminal to access the digital signage software. Once connected, double click on the “Content Manager” shortcut on the desktop to open the software.
In the content tab (lower left-hand section) of FWi locate your department’s folder, right click on it, select “New content in this category”, and then select which type of content it is.
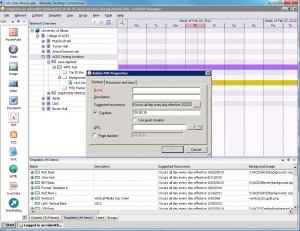
A “properties” window will pop up. This is where you need to enter information about your content. (click on image to view larger version)
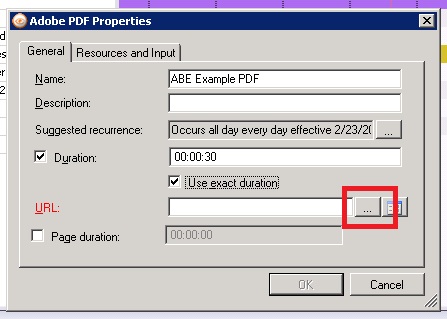
For Name:, enter the name of the content. This field is important because it identifies who owns the content and what it is. Remember to use the agreed upon abbreviation for your department (example: Ag and Bio Engineering uses ABE).
For Description: you can enter any important information about your content, such as how long it should run or what event it is for. A description is not required.
For Duration: you need to think about what else is displaying on your sign. If there is nothing else playing in the same region this content piece will play, you can uncheck duration. Usually there will be other content playing though, so you need to decide how long you want this particular piece of content to play. 30 seconds is the default and a good duration for most content items. If it is text-heavy, you may want to set the duration longer, however if there are several content slides on your sign, you might want to set duration to a lower number so the content is shuffled through quicker. When you are setting duration, make sure to also check Use exact duration.
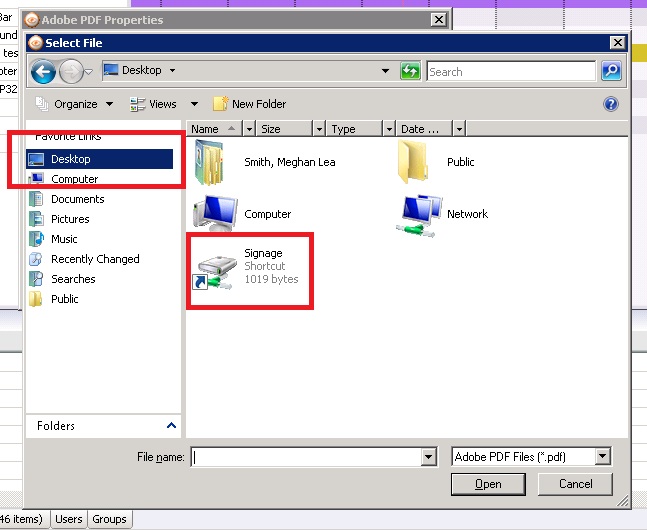
For URL: you must choose the file that you saved to the shared drive earlier. Click on the “…”.
Navigate to your folder on the shared drive and choose the desired file. If you don’t see the drive, choose “Desktop” on the right hand side and then click on the Signage drive.
(Depending on which type of content you’ve chosen, there may be additional fields to fill out. If you have any questions, you can contact us at techsupport@itcs.illinois.edu.)
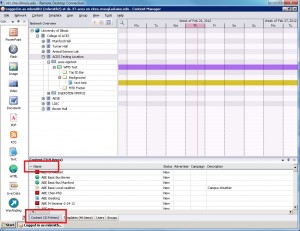
When everything has been filled out, click OK. Your content will now be available in FourWinds. To locate it, click on the “Content” tab in the lower left hand corner of the program and select your departments content folder. If you don’t see your content immediately, you may need to click on the “Name” heading to alphabetize the content; brand new content usually appears at the bottom of the content list. (click on image to view larger version)
Once you have located your content, all you have to do is click on the content and drag it up to the appropriate region on your sign. Make sure you are only dragging the content you want, it’s easy to grab extra content you didn’t mean to. Once the content has been dragged to your sign’s “Main” content region, right click on your sign and select deploy to deploy it to your sign. Doing so will copy these settings and files to your signage player and will display it as scheduled. NOTE: Hitting “Save” or “Refresh” will not update your sign; you must hit “Deploy” for any changes to take effect.
Please remember: Be very careful when you click/drag. Do not delete any content unless you own it.
Print Article


